
Always code as if the guy who ends up maintaining your code will be a violent psychopath who knows where you live.– Martin Golding
In previous posts, I had discussed how Rperform can be used to obtain and visualize package performance data. However, real-world software development is a collaborative process. Thus, automating performance testing for your package is not only a good idea, it’s a critical one; testing projects locally might not be good enough. This post will cover usage of Rperform with Travis CI for automated performance testing. More importantly, we will be able to assess performance impact of incoming PRs.
Background
According to Techopedia, Continuous Integration (CI) is…
“Continuous integration (CI) is a software development practice in which each member of a development team integrates his work with that produced by others on a continuous basis.”
For a more comprehensive introduction to CI, refer to the blog, A Simple Guide to Understanding Continuous Integration (CI), by Nutcache.
Travis CI is a hosted, distributed continuous integration service used to build and test software projects hosted on GitHub. Open source projects may be tested at no charge via travis-ci.org. Private projects may be tested at the same location on a fee basis.
The travis system provides support for many major programming languages, including R. Detailed documentation is available on their website, including a guide for complete beginners to continuous integration and a tutorial for using Travis CI with a github hosted repository.
Rperform is a package that allows R developers to track and visualize quantitative performance metrics of their code. It was initiated as a GSoC 2015 project and was also a part of GSoC 2016 under the organization, R Project for Statistical Computing.
It focuses on providing changes in a package’s performance metrics, related to runtime and memory, over different git versions and across git branches. Rperform can be integrated with Travis CI to do performance testing during Travis builds by making changes to the repo’s .travis.yml file. It can prove to be particularly useful while measuring the possible changes which can be introduced by a pull request (PR).
More information about the package, including introductory tutorials, can be found on its Github Wiki.
Overview
When code is pushed into a repository using Travis CI, a build for the project gets triggered on the Travis system. A build gets triggered in the event of an incoming pull request (PR) as well. All that needs to be done for Travis to work is to include a configuration file in the github repo, and enable it for the repository you want to build on your Travis profile page.
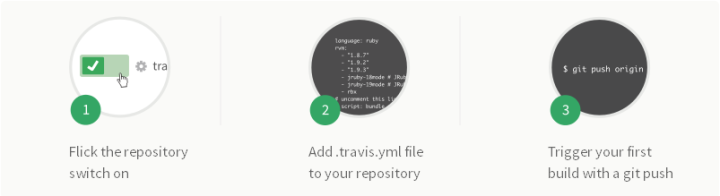
By adding a few lines to the Travis configuration file, Rperform can be set up to run each time a build gets triggered. The results for each build are saved as a webpage in a subdirectory named ‘Rperform‘ on the repo’s gh-pages branch. An example of such a webpage can be found here.
Setup
Dummy package
We will use a dummy package to understand how Rperform can be integrated with Travis CI builds. This package, PRDemo_Rperform, is hosted on Github and is already set up to run Rperform with Travis. Before being configured for Rperform, the .travis.yml file looked like this, as opposed to how it looks now.
Rest of the section explains the steps that were followed to configure the repo.
Note: Steps provided in this section can also be found as a follow-along tutorial on Rperform’s wiki.
Step 1: Generation of an encrypted access token
You will need to generate an access token that will be used to allow Travis to push a webpage containing Rperform’s results to your GitHub repo’s gh-page branch. This will be some really long alphanumeric string. You can generate one by going to settings -> personal access tokens -> generate new token. Since we are working with a public repo, selecting only the public_repo option under scope would do.
You will also need to install the travis ruby framework.
gem install travis
After installing, navigate to your git repo for the project you want to enable automatic pushing of content for, and then login to travis-ci and secure the GitHub token.
travis logintravis encrypt GH_TOKEN="yourgithubtoken"
This will generate output that should be copied to your .travis.yml file in a subsequent step. We will refer to this output as yoursecurestring. Essentially we have created an environment variable GH_TOKEN with your actual GitHub token, that is encrypted on the travis-ci servers. So this way you don’t expose your actual GitHub token to anyone who looks at your .travis.yml file!
Step 2: Creation of gh-pages branch
-
Create and checkout into an orphan gh-pages branch in the RperformTestPackage directory. This step is required if a gh-pages branch doesn’t already exist for the repo. Otherwise, simply checking out into the gh-pages branch will do.
cd RperformTestPackage
git checkout --orphan gh-pages
git rm -rf .
- Make an Rperform directory and create an empty index.html file inside it.
mkdir Rperform
touch Rperform/index.html
- Commit and push the changes. Then, checkout into the master branch.
git add Rperform/index.html
git commit -m "Added Rperform directory in gh-pages branch"
git push origin gh-pages
git checkout master
Step 3: Updating the .travis.yml file
-
For a sample .travis.yml file configured to work with Rperform, look here. We use this sample file as a reference.
-
Add the package names given under r_packages and r_github_packages in the sample file to your .travis.yml file under the respective sections.
r_packages:
  - microbenchmark
  - roxygen2
  - rmarkdown

r_github_packages:
  - analyticalmonk/Rperform
- Add the command given under before_script in the sample file to your .travis.yml file.
before_script:
- travis_wait 30 source `Rscript -e "cat(find.package(\"Rperform\"))"`/push_gh_pages.sh
- Next, we need to configure our environment variables.
env:
  global:
  - secure: "ENTER_YOUR_ENCRYPTED_GITHUB_ACCESS_TOKEN_HERE"
  - USER_EMAIL="INSERT_A_VALID_EMAIL_ID_HERE"
  - USER_NAME="INSERT_USERNAME_HERE"
  - PR_COMMAND="Rperform::plot_PR_webpage('./INSERT_PATH_TO_TEST_DIR/INSERT_TEST_NAME_HERE', metric = 'time')"
  - RPERFORM_COMMAND="Rperform::plot_webpage(test_directory = './INSERT_PATH_TO_TEST_DIR/', metric = 'time')"
Your encrypted_github_access_token is nothing but the yoursecurestring generated in Step 1.
USER_EMAIL and USER_NAME aren’t required but put them in anyway if you want.
RPERFORM_COMMAND and PR_COMMAND are the Rperform commands run when a regular build and Pull Request build are triggered respectively. We will focus on regular builds. More on PR builds in another tutorial.
When configured for PRDemo_Rperform, these environment variables look like this:
env:
  global:
  - secure: "p17aMAh2hcyzK59ExIh8wCirdFvZM/BdoOavFomi4oIF4vIN51XDEoIQgySHcL2dEr24BJapIJTrFnfTOzc/6dyfEnF5HJssn1ilBM5jCWy2jY5fQDm0VZqqIHH8bFKRuoC2v6phP3wgKVK8YBAqpbpM338v0RsxAVNjtw0Rf1UO3h4RQMxn+BSvGiB7RKM+7Q24qpmzFxUNvDPT+R67Tguz92ohyoFj4fC9tWYU+qJuznGiciOTtI3wkfaD/zxIt+LjfpxKUJlNzD0Vq4jAmzrO8C5F5YSXGiwtrPoJhnUoQRvDVH4RChQvybCQ9CjzuMSp36DS/5FdDtve5GrmFcW2chSL/DC4/6ZEQLnpc8bU5WkfsTwt5eEvxesSBilGvihg2WwQLXJMeZUf0LSJKm0a4wJCRxqb9kkq0bRHZnv/CP2XZ9VD4rzCIS7zBYk3CI5UR2NYKFHNTy4mv7jeKFgWvSJFCiERW9BIdS0hUK00y/6g1lItdiPbUwllcORzzuqXHO+YD54JqzhWpIzCIlXZzdXBeaZTPoZy04iNeQREVZBR/YCEpL7ilQpZQ07yxV05IZZXiM/B4llBdgZPhUTH/anxCO6Y4x84r6zYZ/ph4+QzO4W3AC+p3wi/6B076+kHUr/0tuO1Q0hrJACGAE8LOMGG04Lc/eBWFReTido="
  - USER_EMAIL="analyticalmonk@github.com"
  - USER_NAME="analyticalmonk"
  - PR_COMMAND="Rperform::plot_PR_webpage(test_path = './tests/testthat/testTime.R', metric = 'time')"
  - RPERFORM_COMMAND="Rperform::plot_webpage(test_directory = './tests/testthat', metric = 'time')"
- Add and commit the changes.
git add .
git commit -m "Configured Travis CI to run Rperform"
How it works?
As explained in a previous post, Rperform can be used for performance testing by analyzing a package’s test files. In PRDemo_Rperform’s case, there are two types of functions which need to be analyzed. We do so by running Rperform commands, written into the .travis.yml file as environment variables in the previous section, on the packages’s test files.
The performance test results generated (as webpages) for the PRDemo_Rperform can be found here: https://github.com/analyticalmonk/PRDemo_Rperform/tree/gh-pages/Rperform. Latest build results can be directly viewed here: https://analyticalmonk.github.io/PRDemo_Rperform/Rperform.
Note: The shell script responsible for pushing generated webpages to the repo can be found here.
Pull Requests
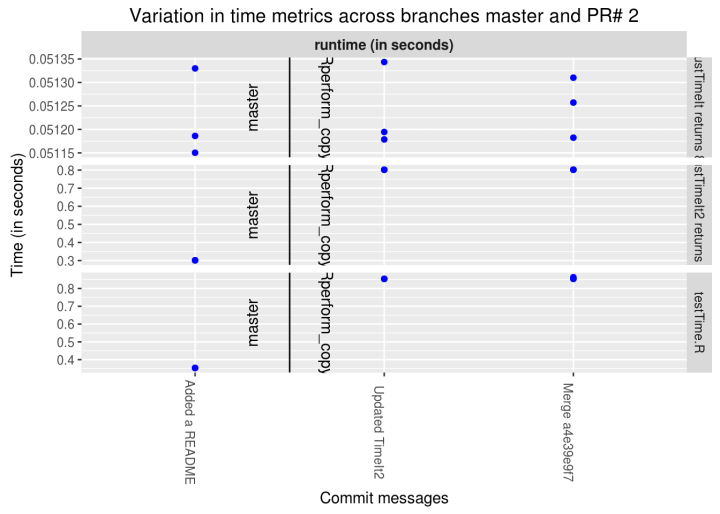
Provided that a PR is started by a contributor (someone with access to the repository), a performance webpage will be generated for it as well. Two PRs were started for PRDemo_Rperform, as seen here. One of them was by the repo owner and other by a contributor. Through the webpages generated for both PR#1 and PR#2, we can assess the potential performance impact of merging them.
For example, PR#2 slows down the justTimeIt2() function.
Tip: To see the webpage for yourself, copy the contents of the HTML file into a real-time HTML editor such as this one.
Road Ahead
Work needs to be done on creating a UI. Also, there are minor functions yet to implemented for the case of PR builds. But the package, even in its current state, should prove to be pretty useful. If you are an R package developer, please try out Rperform on your code and provide feedback if possible.
Note:
If you want to get in touch, drop me a mail, or hit me up on Twitter, Github or Quora.
If any problem arises, please open an issue on Github.
You can find out more about me on my personal webpage.
